mother's day brag book card | tutorial

As most of you know, I'm a Mom to three kids aged 20, 8 and 6, and even though Zach is in the Navy, I still try to find ways to incorporate him into our holiday celebrations. If I plead with him long enough, he sends me a photo every now and then and it's one of those photos that I'll be including into these photo brag book cards I've made for our Mom's this year.

THE CARDS


I know how lucky my kids are to have both grandmothers {Nana and Oma} living so very close to us. Having grown up in a military family with a Mom of German heritage, I don't think that I was ever lucky enough to celebrate a Mother's Day with either of my grandmothers. Therefore, when both sides of our Family get together at our home each year, as we have for the past 13 years, I tend to create gifts and cards that are similar so that both Nana and Oma feels "equally" special. Wink, wink.

PROJECT TUTORIAL

To create these two photo brag book cards with one sheet of 12x12 paper in less than ten minutes, here are your easy steps.
1.  Trim your 12x12 double sided patterned cardstock at 5.50" and then again at 11", which will leave you with two 5.50" x 12" wide strips with a 1" x 12" strip remaining.
2.  Using your scorer, score at 4 1/8" and 4.25" and then again at 8.50".
3.  Fold the score lines and fold in the right panel before corner rounding the two outer corners.
4.  Gather your small glassine envelopes and machine stitch them to the last panel of the card. If you don't want to stitch, you could also use your favorite adhesive, staples or even washi tape.


5.  Punch a 1" circle. With your Crop-o-Dile, attach the punched circle and grommet being sure to cut your baker's twine long enough to wrap around the card. Here you can see how I tied the twine on the underside of the punched circle before attaching the whole unit to the card.


6.  Wrap the baker's twine around the card and thread through the grommet to tie off a sweet little bow. 

TIP: This is a traditional sized greeting card that will fit into an A2 envelope, just in case you need to send yours in the mail. Bonus! 

PROJECT COMPLETION


Now the Grandmother's will have a cute brag book with a photo of their two sweet granddaughters and their grandson, too. {His photo is in the glassine envelope behind the girls' photo.} In the middle panel of the card, seen in the second photo, there's room for my husband and I to each write a personal message to honor the Moms.
Two cards in ten minutes...sweet!

the twinery & srm stickers | product showcase

Today and tomorrow, designers from both The Twinery and SRM Stickers are teaming up to showcase projects using both baker's twine and stickers. That's right, we welcome you to be inspired and {to win} you'll want to begin at The Twinery blog to get a complete list of participants from our team so that you can leave a 

The 14th Anniversary of the day I became Mrs. Wright will soon be here. And because I know Gordon  rarely reads my blog, I feel pretty safe in sharing this little wall hanging I made with some Maraschino baker's twine from The Twinery and a simple heartfelt sticker from the Thinking of You set by SRM Stickers.


Using a spare page from a die cut mini album I had on hand, I punched another hole to string my Maraschino baker's twine through that, in addition to helping to attach my craft art to the scrapbook paper backing my rustic frame, is also used to string my small hand cut heart inside the tube. To make it stay on my twine, I added a knot below the heart and a knot above the heart to keep it stationary. I attached the 4 strands of baker's twine with two glue dots to the paper and covered the glue dots with a circle punched piece of red cardstock that matches the heart and the backing to the Love You sticker.


You might want to remember this project come Valentine's Day next year as it would also make a perfectly lovely gift idea for your husband then as well! Or even the kids.

And just for you...a way to share your stash of The Twinery twine with a dear friend. After wrapping my mini spools with a sampling of baker's twine, I wrapped the lid of the tube with one of our newer shades of twine, Shore, and a small section of the yellow scalloped border sticker.


To make the For You tag, just add your sticker to light blue cardstock, circle punch it, and add two small holes to string your baker's twine through holding it in place with two small knots.


Now for your chance to win some baker's twine from The Twinery...


the prize will be 3 full spools | winner's choice of colors ($42 value)


To be eligible to win, you MUST leave a comment on each of the participating designers' blogs from The Twinery. A complete list of designers will be on The Twinery blog each day. Deadline to leave comments is 11:59 pm Sunday, April 29th. Don't forget to leave your e-mail address so we can contact you if you're the winner.

Thanks to SRM Stickers for providing the tubes and sticker collections for me to create with.

flair for your hair

Continuing the love affair I have with the Flair buttons from Momenta, let's doll up a few everyday items and turn them into boutique-quality hair accessories for the little girls in your life. It seems that Victoria and Isabella are migrating away from cute hair bows and into headbands and clips, much to my dismay.

Not to be outdone, I've found a few way to kick it up a notch! Taking a pack of headbands from the Dollar Tree, I wrapped some coordinating baker's twine around the top section, using some E6000 craft glue to safely adhere it. Then taking some coordinating patterned cardstock, I doubled it over and glued it, to give the flair button an extra sturdy base to be adhered to.


And of course, if Little Sis has an embellished headband, all of a sudden, Big Sister wants one as well. 


The embellishment had actually fallen off this clip, so I recycled it by adding a flair button turning something that might have been thrown away to a wearable piece of hair art.


Have I convinced you yet how really versatile and handy it is to have a pack, or three, of Flair buttons on hand? You can see other projects I've featured using Flair buttons here and here.

call me!

Who knew that pre-tween girls {is that what you call 8-year olds} would be phoning each other in the 3rd grade? Sure, my daughter knows her phone number, but...


...wouldn't it be cuter to hand out a personalized calling card? There are so many Peel & Stick stamp sets from PSA Essentials that I could have used, but the FRENCHIE collection just seemed so right with that retro telephone image!

After designing a card in my word processing program with my daughter's name and telephone number, I printed them, added my PSA Essentials telephone image and trimmed them to size to fit into my business card sized tin. {I have these in my Etsy shop and you can find the tins here.}


To add more pink, if that's even possible, I added some scrapbooking paper from Momenta to the cards and threaded some baker's twine through holes that I punched in the cards. Yes, I even embellished the top of the tin with more pink paper and another telephone...just to make it extra cute! 


What a perfect size to keep in her backpack, don't you think? I just might make some of these for my 70-year old Mom, she's still a girly girl after all these years.

project life printables | write.click.scrapbook

I adore the idea of capturing and documenting and collecting all the really fabulous memories of our everyday lives. And even though I don't participate in Becky Higgins' Project Life, I designed some journaling cards for the post today at write.click.scrapbook. that will be fun additions to your albums if you're following along with the Project Life phenomenon.

Life Is Good Scrapbook Layout | iloveitallwithmonikawright.com

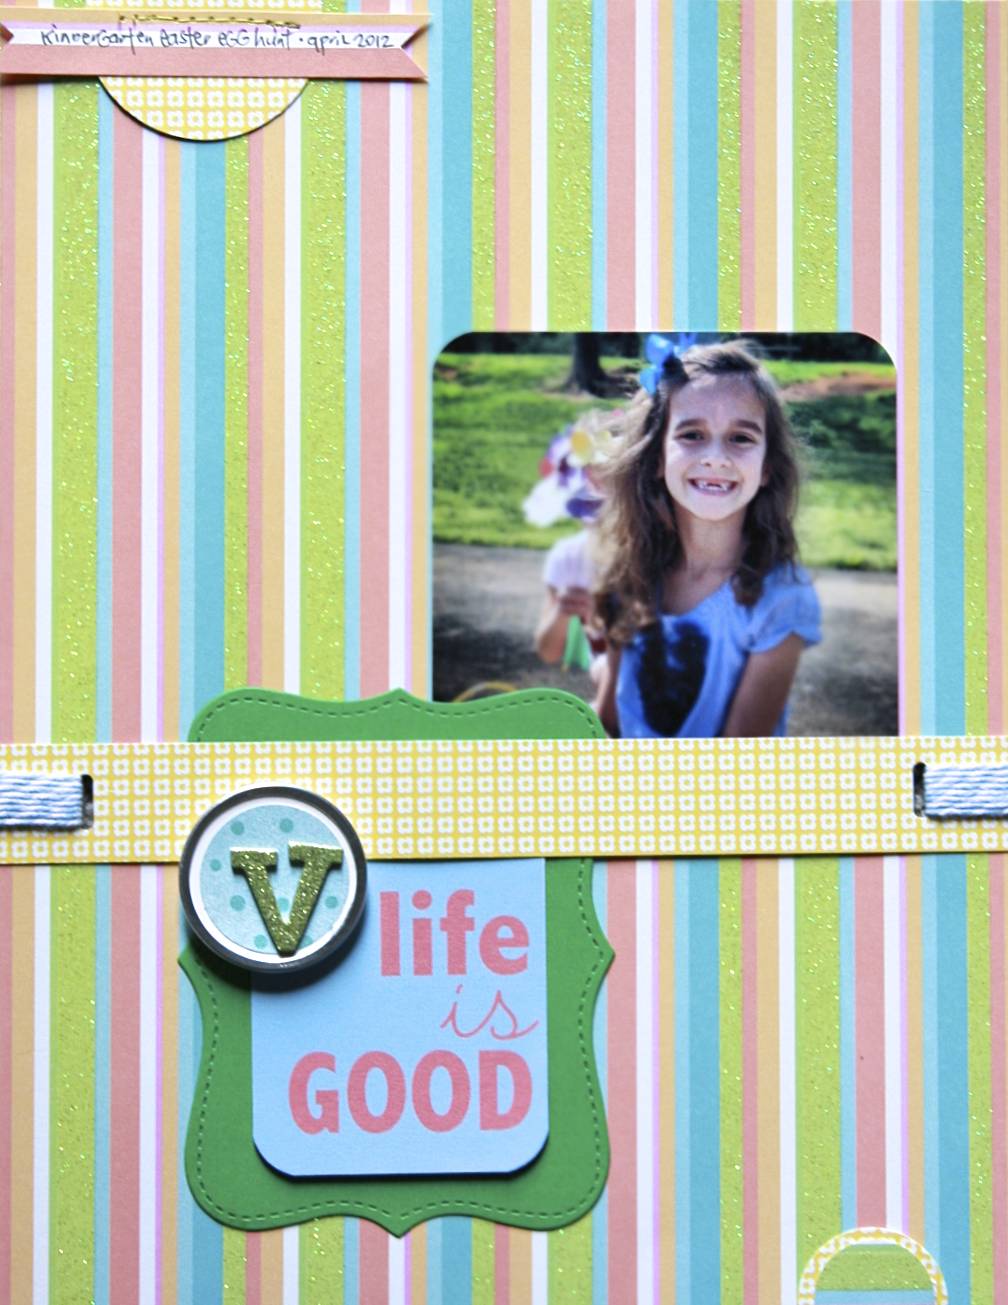
To show the versatility of these printables for Project Life, I trimmed the 3x4 card even further and added it to this layout of my toothless wonder, Victoria, at her Kindergarten Easter Egg Hunt. It was so worth the trip to school on a busy day just to see the joy on her face when she saw me waiting for her on the playground {where the Egg Hunt was to take place}. I used quite a few items that I seem to turn to time and again: metal-rimmed tags, the bracket shaped die cuts, baker's twine from The Twinery and my Instagram photos. 

Here's a look at the rest of the cards on the printable over at write.click.scrapbook. There is a 4x6 card for journaling and there's even room for a small photo where the arrow is, a 6x4 card {to be used in one of the tall pockets} to add a photo of your home and two 3x4 cards, one of them is a general purpose card to tell your story and the other is the Life Is Good card I used on my layout. 

Print them as many times as you'd like, I hope you enjoy them. If you happen to use them in your own album or make a layout or mini book with them, I'd adore you leaving a link to your photos or blog post in the comments so I can stop in for a visit!

Project Life Printables | iloveitallwithmonikawright.com

52Photos | book


my 52Photos capture

I don't read as many books as I used to and it makes me sad. I love to read. And I don't read any earth shattering novels that have me learning to change the world or make it a better place. I read purely for pleasure. I like family life | home style magazines for inspiration, I like mysteries to keep me guessing and I like chick lit just because. Recently, I have been on a mission to read some novels, that at my age, I should have already read but haven't. And that's a nice feeling.

next week's theme

picnic

the wrap-up

Always feel free to jump in and join the 52Photos group.


wood block art displays | oh my crafts! giveaway

My girls produce quite an array of art. By using a set of four 3" x 3" blocks from Oh My Crafts!, I was able to make two display pieces that elevate their art to much more than just another doodle. 

I let my inner artist get crafty with this first project! I painted each side of the block a different color combination. Here you can see the front, where I added the tag holder and a small shipping tag. I have another tag with Isabella's name. Don't have a bracket? Use some chalkboard paint and change the name as your artist-of-the-day changes. I know the girls will be working hard to see whose artwork will be displayed on our wood block easel.

wood block art display | iloveitallwithmonikawright.com

I wrapped the dowel in some Lemondrop baker's twine from The Twinery and added a small clothespin to the top of the dowel to hold the masterpieces that fill our home. As you can see below, I pulled out my small collection of washi tape and adhered a few strips to the side. I then used a light swipe of pink paint over the washi tape to soften the look.

wood block art display | iloveitallwithmonikawright.com

We also have a few 3D creative treasures to display. Use your favorite glue to attach four small wood knobs, paint the wood block in your favorite color {I used spray paint} and suddenly this simple crafting item becomes a charming piece of home decor.

wood block art display | iloveitallwithmonikawright.com

Now, Isabella's art class pottery puppy is proudly being displayed next to Zach's award-winning Art Show weaving in our family room. I used a light coat of spray gloss to highlight the paint and give it a pleasing vibrant look. 

wood block art display | iloveitallwithmonikawright.com

I bet you have ideas swirling around in your head about how you could use some wood blocks for a few projects at your house, don't you? Or, you might even want to create your very own Smash style Journal like I did the last time OMC sponsored a giveaway. You're in luck, because Oh My Crafts! wants to reward one of my blog readers...


...a $25 gift certificate to Oh My Crafts! Hop over to the Oh My Crafts! Facebook page, LIKE them and tell them I Love It All sent you. Then, be sure to come back and leave a comment here before Friday at 8pm EST when I'll be choosing a winner from the commenters. Be sure to leave your e-mail address so that I can contact you with your gift code. THIS GIVEAWAY IS NOW CLOSED.

published

Published, yes, but not in quite the way you might be imagining the scenario.


Not many of you are JP Magazine readers I'm sure. I'm not either, but Gordon surely is. And one Sunday morning a few months back, as we were sitting in the Living Room drinking a cup of coffee in our favorite chairs in front of the fireplace, he tells me that he just e-mailed a photo of me and his Jeep to JP magazine. Conversation ensues. And I tell him that they'll never publish a photo of someone as old as me, fully clothed, in that magazine. They're looking for really cute, young chicks. 


He receives an e-mail, within days, telling him that the photo will be used for publication. I quickly told him that they were just being kind to him by telling him that and that I still firmly believed they would not publish my photo. And anyway, he didn't ask me if he could submit my photo as it was. Hmph.


I don't think I've heard Gordon laugh quite as loudly as the other day when he "ran" out the kitchen door to tell me that I was a JP Chix {translation: Jeep Chicks}! Still didn't believe him, if you want to know. That's me and the blue Jeep on the left in nearly the same spot as when I took these weekend wildflower walk photos a few weeks ago.


I will add that Papa got a real kick out of seeing me in the magazine, when Gordon felt the need to show it to him. So I have been proven wrong, again, by my quite handsome, and quite right, Mr. wRight! Not the first time, I will tell you. He does get bonus points for submitting such a sweet bio to go along with the photo, though. Okay, lots of bonus points.

So the next time you are in your local bookstore, check out the latest issue of JP Magazine and flip to the very last page, that's where you'll find me. Now, you can tell all your friends and they can have a good laugh about it, too! By the way, Gordon just felt this was a wonderful topic to blog about and has been asking me each day if I have blogged about it yet.

Sweetie...here's your blog post. And it's probably the only one you've read this year. I Love You!

featured | aussie scrap source

How great is that? Aussie Scrap Source, the premier wholesaler of scrapbook and craft paper and supplies in Australiahas an Echo Park project extravaganza on their blog today and is featuring the perpetual calendar I created for The Twinery | Echo Park blog hop last year. 

You may also remember that the Echo Park blog featured my mini composition book project from that very same hop on their blog as well. I just adore the Springtime collection, it remains one of my favorites.

Don't miss out on all the inspiration on this Friday the 13th, head on over to Aussie Scrap Source and tell them I sent you!

52Photos | party


my 52Photos capture

With Gordon out of town on my birthday, I made a command decision to order the Pizza Party in a Box and have a picnic slash early dinner with the girls. We spread a blanket on the back lawn, overlooking the creek, and sat down to our pink pizza party! The weather was absolutely gorgeous, the company adorable and the memory not forgotten. And we even had leftovers for the next night...Gordon was still away on business. 

next week's theme

book

the wrap-up

What prompts do you think would be good themes to photograph in the coming weeks?


30 Days of Lists | Days 23 - 31

The last few days of my 30 Lists mini book pages to share. The really great thing about some of the list prompts are that for just a few moments each day, I am thinking about something that I would not normally give a second thought to. I can't wait to read these lists in a few years and see how my thoughts might have changed.

Day 23 | Confessions

#lists #30lists #30DaysofLists #iloveitall #mini album #mini book

Day 24 | I Am Famous For

#lists #30lists #30DaysofLists #iloveitall #mini album #mini book

Day 25 | Title Options For My Autobiography

#lists #30lists #30DaysofLists #iloveitall #mini album #mini book

Day 26 | My Morning Routine

#lists #30lists #30DaysofLists #iloveitall #mini album #mini book

Day 27 | If I Could Do It All Over Again

#lists #30lists #30DaysofLists #iloveitall #mini album #mini book

Day 28 | My Last Meal Would Include

special note . really? this had to be the list on my birthday? i did not even give this morbid list a go and skipped it altogether. had no interest in giving it a thought.


Day 29 | Songs That Make Me Want to Dance

#lists #30lists #30DaysofLists #iloveitall #mini album #mini book

Day 30 | Letter to My Future Self

#lists #30lists #30DaysofLists #iloveitall #mini album #mini book

Finis.

#lists #30lists #30DaysofLists #iloveitall #mini album #mini book

HELPFUL LINKS
Find Days 1 - 22 of the 30 Days of Lists mini book here.
Read more about the #30lists
Fun and color Embellishment Kits for your mini books and journals.

5 on the 5th | april 2012

I can see that photos for the next several months are going to be full of outdoor fun. Now that that our weather is warmer and sunnier, these girls want to be outside from the moment they arrive home from school.


1 | after days and days of sunshine, we had overcast skies and somewhat lower temperatures. no biggie, except that the Kindergarten Easter Egg Hunt was scheduled. twice on the way to school, Isabella reminded Victoria that the basket she was taking to school with her was just on loan for the hunt. you see, it's bigger than Victoria's basket and Isabella wanted to make sure this bigger basket would be returned to her after school today in preparation for Sunday's hunt at Nana's house. kids.

2 | silly big girl riding the tricycle in quite an unusual way and silly littlest girl enjoying being the leader

3 | driveway art depicting the solar system

4 | what remained {nothing} of our dinner of shrimp scampi and buttery, crusty bread

5 | welcome to charleston, s.c. - Zach's contribution


Here's where you can find the January,  February and March editions of 5 on the 5th. I'm using the Instagram filters for my photos and if you'd like to see more of my photos, you can follow me on Instagram {monikawright} to see these and others quirky photos taken on the spur of the moment.

our Easter in photos

The Hunt begins!


After our delicious Lunch, the Outdoor Hunt commences. Both sides of our family gather together on Easter {at Nana's and Papa's} and on Thanksgiving {at Oma's} then at our House on Mother's Day, Father's Day and birthdays for the kids. There's Oma, my brother James, my Mom's friend Jim, my brother-in-law Chad, Nana and that's my hottie holding the new iPad videoing the Hunt.


The Wright Girls {sans Zachi this year, he's still in Charleston}.


And these gems from Isabella. To imagine that there was a time we couldn't get her to smile for the camera!


Isabella took over as Family Documentarian as she snapped these photos of Gordon and I. She posed us, as she's seen her Mommy do time and time again, and the entire time Baby was telling us to kiss each other.


Oma and Jim


Nana and Papa


Squirt and Little Bit {that's what Papa calls them} with their Nana and Papa


The Wright Gang


And us.


We were blessed with the gift of Family, a feast of family favorites, a perfectly gorgeous day and God's love. 

P.S. We miss you Zach. This much.