something wonderful | my mind's eye

This month marks my last post as a Design Team member for My Mind's Eye. It has been a wonderful opportunity with the chance to work with some lovely and creative ladies. And the paper, my goodness, the papers and embellishments and decorative tape and, well...you know how uber-awesome all things My Mind's Eye truly are.

Something Wonderful Mini Album | iloveitallwithmonikawright.com

Hop over to the My Mind's Eye blog today to see the rest of the mini album and a quick tutorial so that you can make one just like mine.

right now | july 2013

There are projects that are still ongoing here at The Love Shack:  mud porch, purging old scrappy supplies and publications, working to get a "final" resting place for my goodies in the Studio, following through on decisions made and back-to-school shopping.

Right Now Mini Album Download | iloveitallwithmonikawright.com

What's going on in your world?


july | 7.25.13

feeling
contant. zach is home for a visit and the girls love having their zachi home.

on the to do list
buy more food. i forgot how much more i have to cook with a hungry boy.

my guilty pleasure
time alone with my sweetie. just us. no kids.

favorites
tv shows:  castle, elementary, revenge, motive

dreaming about
how comfy our new restoration hardware porch furniture will be.

grateful for
the time to be together. ❤

Create your own right now mini book with the download found here
Here's the post where I share how I created my mini album.


right now archives

happy birthday cards | tutorial

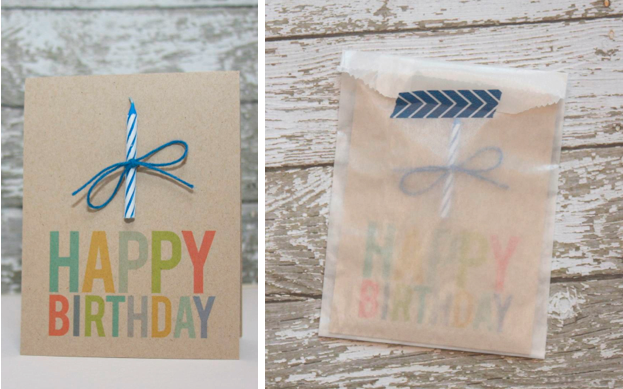
Turn your printers on, grab a stack of cardstock, some baker's twine, your favorite roll of washi tape and some adhesive. Today, I'm going to share some tutorials and we're going to create a handful of Happy Birthday cards to get you through the next couple of months. That's right, no more scrambling for a card at the last minute, we're doing this assembly line style!

Before we get started, you can find the card template as a download in my Etsy shop here. Buy once, print as many times as you'd like on any paper you desire! To show you how great the colors appear on a variety of papers, I've used both a bright white 110 lb. cardstock and a kraft speckle tone cardstock with great success.

AND ONE TO GROW ON

Happy Birthday Card Download | iloveitallwithmonikawright.com
Glassine Bags in 4 different sizes

  • Print, Trim, Score and Fold Card
  • Place Candle on Front of Card
  • Pierce Card on Each Side of Candle
  • Thread Baker's Twine through Holes + Tie Bow
  • Write Your Birthday Wishes

ROUND AND ROUND

Happy Birthday Card Download | iloveitallwithmonikawright.com
Patterned Papers from Echo Park | Kraft Paper Bags 

  • Print, Trim, Score and Fold Card
  • Punch 2" Circle and three 1.50" Circles from Your Favorite Cardstock
  • Score and Fold in Half the Three 1.50" Circles
  • Adhere Circles Together then Adhere to Card Front
  • Round Bottom Corners of Card
  • Write Your Birthday Wishes and insert inside Kraft Bag

DIE CUTS AND YOU

Happy Birthday Card Download | iloveitallwithmonikawright.com

  • Print, Trim, Score and Fold Card
  • Search your Stash for A Few Cute Die Cut Stickers
  • Adhere to Card Front
  • Round Bottom Corners of Card
  • Write Your Birthday Wishes and insert inside Gray Vellum Envelope

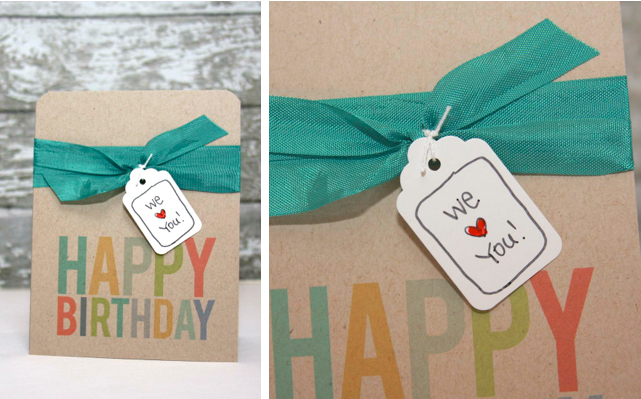
ALL WRAPPED UP

Happy Birthday Card Download | iloveitallwithmonikawright.com
  • Print, Trim, Score and Fold Card
  • Wrap Card Front with Seam Binding
  • Write Message on Tag and Tie to Seam Binding
  • Round Top Corners of Card Front
  • Write Your Happy Birthday Wishes

MAKING A NEGATIVE A POSITIVE
  • Print, Trim, Score and Fold Card
  • Choose the Negative {or Positive} from your Letter Chipboard Stash
  • Adhere Chipboard Letter to Card Front
  • Write Your Birthday Wishes and tuck inside your Glassine Bag

AND A FEW NOTES

This clean and simple design works on so many levels...for your favorite Teacher, co-worker, gal pal, guy friend and for all those birthday parties the kids get invited to. Take it even one step further, and make a set to give as gifts...who couldn't use a secret stash of birthday cards, right?

Find more card making inspiration here:

World's Best Mom Card Download
Everyday Card Download

paper kit week | my mind's eye

All week, designers from My Mind's Eye have been creating projects using just the papers and elements found in the Paper & Accessories kits. It's fun to "limit" ourselves to just one collection, but in no way are you limited by quantity of papers or design elements from MME. These babies are full of goodness!

I created an inspirational piece of home decor that I'm displaying in my Studio, I hope you'll have a chance to stop by to check it out here.

#homedecor #inspirational #scrapbooking #mymindseye

distracted

It's not uncommon for me to be distracted. Occasionally, it's because I don't want to do what really needs to be done but more often, it comes from me trying to do so many things at once and then I tend to lose focus. By that I mean that I am focused, but the problem is that I am focused on several projects at once. Sometimes it's a good thing and other times, it's good for no one but me, meaning that what I should have done gets put aside for something that I "think" needs to be done instead.

Confused?

ALTERED NOTEBOOK

For example, I should have been doing some tax paperwork, but instead I altered a notebook with a Project Life journaling card and some goodies from My Mind's Eye. Not too much frou frou as I'll be using this notebook quite a bit in the next few months, but cute enough to make me smile each time I pick it up.

Altered Notebook with Washi Tape | iloveitallwithmonikawright.com

See how I used washi tape on the pages? That's my favorite part of the whole project, turn the page and find another cute pattern. I even used it to add a little tab, can you see it?

I'm using this notebook to make notes and list concerns about the plan from our landscaper, who just also happened to be one of Zach's Pee Wee football coach years ago.

CHANGING TABLE CHANGE-EROO

Doing laundry one rainy, weekend afternoon, I decided that our Furnace Room was out of control. Okay so I still did the laundry and ironing, but I also overhauled the Furnace Room {which is connected to the laundry room} in the process. A lot of purging, rearranging and ORGANIZATION!

Changing Table ReUse | iloveitallwithmonikawright.com

That's the very old changing table, which has a storied life I need to document sometime, and on top of it sits the cabinet Gordon built that hung above our front load washer. Now that it has bitten the dust, we are back to an old-fashioned top loader and the cabinet had to come down. 

There you go, even though I got distracted, I accomplished two fun projects, plus I did get my tax work completed as well. Win, win!

one for the books

This is the first year the girls have played baseball. Yes baseball, not softball. To top it off, it was a co-ed team, there was just one other girl on the team. The talent spectrum was all over the field, too. There was some remarkable talent for players as young as they were but the majority of the team were players that were first-time players.

What bound our team together was our Coach. He is a kind, caring, encouraging, patient man. I respect those qualities, but even more so when the Coach is dealing with an energetic bunch of kids who have no clue what baseball even is.

The Girls and their Coach |  Monika Wright

I'll add that we were not the best team in our league, perhaps even one of the two at the end of the list. Watching our games, though, we didn't lose by a huge margin in our games and our kids were in the game for 90% of the game. Toward the end, they lost focus, but heck they're all 7 - 9 year old's. {Girls are permitted to be one year older than the boys.}

Be assured, this team had heart and believed they could and tried their hardest to make it happen.


They learned in so many ways and are all better for the experience. And that's a gift they'll always have.

summer stories

Summer is well underway and we've been busy...but in a slow-motion, taking-it-easy kind of way. This mini album kit has been sitting in my Studio the past few weeks just waiting for me to photograph and package it up.

Our Summer Story Mini Album from iloveitall.etsy.com | Monika Wright

And I finally did last night. Even though I've just added them to the shop, I've been using mine to document our own summer story and I'll be sharing pages from our summer story mini album here on Wednesday. Until then, you can find the kit in the shop here.

Our Summer Story Mini Album from iloveitall.etsy.com | Monika Wright

So, what's been your favorite summer memory thus far?

right now | june 2013

Right Now Mini Album Download | Monika Wright

june | 6.27.13

feeling
there are rock piles, stone piles, and mud everywhere, but it will be worth it.

on the to do list
decisions about the curve in the walkways
concrete or stone steps???

my guilty pleasure
even thought it's hot outside, my afternoon coffee break brings me back to life

favorites
almond roca with dark chocolate - yum-o!

dreaming about
the whole mud porch | walkway | garage project being finished

grateful for
thankful to be able to undertake such a big project so we can really enjoy our yard

Create your own right now mini book, with the download found here
Here's the post where I share how I created my mini book.

right now archives

the perfect day | the twinery + ruby rock-it blog hop

You’re in for a treat during the next two days...designers from The Twinery and Ruby Rock-It are teaming up to share creative ideas and inspiration. 


You may have arrived here from the blog of the creative June Goh but if not, you can get the entire line-up at The Twinery. You don’t miss out on a chance to comment and win, you'll have five days to visit all the bloggers on the hop.

THE PERFECT DAY mini album

The Perfect Day Mini Album | Monika Wright

Many of you will know how much I adore a cute mini album and by using just baker’s twine and some Project Cards from the Ruby Rock-It Carnival Queen collection, I was able to create a quick, colorful and fun mini album. 

LET'S GET STARTED

After gathering a selection of the project cards, I embellished the front cover a bit further with the 3D stickers, die-cuts and elements from the Pockets pack, specifically the stickers that are included...they are fun and super cute!

The Perfect Day Mini Album | Monika Wright

THE BINDING
To bind my pages together, I used one strand each of Solid Caribbean, Solid Blossom and Pink Shimmer baker’s twine and tied them into a knot to keep the mini book secure and then proceeded to tie a bow. 

Mini Album Binding Tutorial | Monika Wright

To form the binding, I trimmed my paper, scored it to form the book spine and slipped it over my Project Cards and then threaded my three strands of baker's twine through the holes. It's such an easy and fun way to bind an album!

THE PRIZES


HOW TO WIN
To be eligible for prizes, visit each blog on the hop (and you will have five days to do so) and leave a comment.  Please include your e-mail address in the comment to help us reach you should you be the lucky winner.  

Deadline for commenting to be eligible for prizes is 11:59 EST, Friday July 12th.

Winners will be announced on The Twinery & Ruby Rock-It blogs Monday, July 15th.

Your next stop on our hop will be with the talented Pattie Beltran.

the family that cooks together

Sunday Photos | Monika Wright

With a little help, the girls used their cookbook and made French Toast for Breakfast on Friday. Of course, Chef DaDa had stovetop duties, but they had a ball. I could hear them chatting about the whole process while I was still upstairs making the bed.

do more of what makes you happy

If you've never purchased a Paper & Accessories kit before, you're missing out on a load of fun. I used one from My MInd's Eye, but most paper manufacturers offer page kits. Not only was the entire collection of papers included, 12 double-sided cardstock papers, you also get a full sheet of coordinating stickers.  To create this mini album, I used items found in the Find Your Wings and Fly "Up & Away" collection paper kit designed by Rhonna Farrar for My Mind's Eye. 


UTILIZE YOUR DESIGNER PAPER


When I saw the sentiments on the Up & Away Dreams paper, I knew I had my cover and it was pretty easy to embellish, too. When you begin with a well designed paper, you seldom have to embellish beyond what is already there for you.

On my cover, seen above, I added the green banner sticker and the heart {I do love it all!}, but the other graphics are all part of the amazing paper design.

CREATIVE USE OF STICKERS


By adding stickers to your pages, you've added interest, dimension and character. The added bonus is that often times the stickers are a jumping off point for your journaling. 

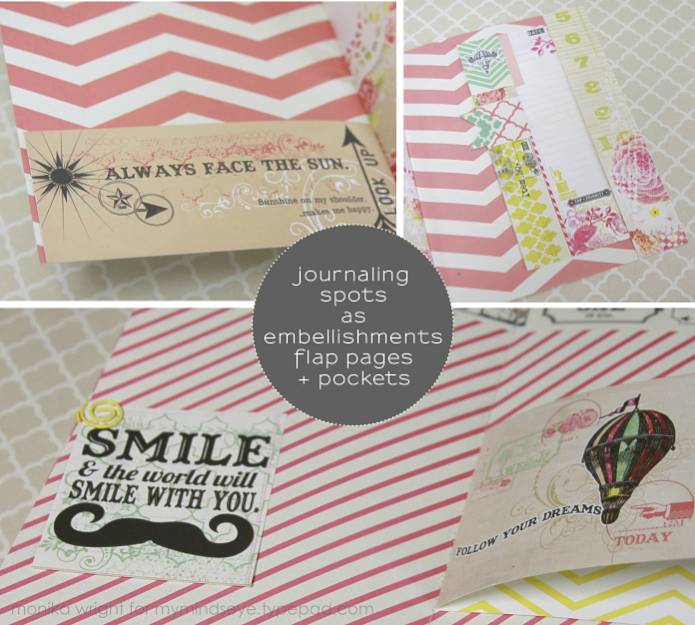
MAKE YOUR JOURNALING SPOTS WORK FOR YOU


Using Journaling Cards in Mini Albums | Monika Wright

Think you won't use all those journaling spots?
  • Have you thought about using them to add pockets to your pages? Add adhesive to three sides of your journaling card and pop onto your page, like I did on the inside front cover. 
  • For the inside back cover, I used on of the more narrow journaling elements to adhere on three sides, added yet another journaling spot inside the pocket I created and then popped on some arrows from the sticker accessory sheet  as a pull tab. 
  • Look in your stash for a cute paper clip to add a journaling embellishment to your page.
  • Or even trim a series of journaling spots and add it to your mini book as a page.

TUTORIAL

Using the Find Your Wings and Fly Collection Paper & Accessories Kit

Cover  |  Trim your Up & Away Dreams paper to 12" wide x 8" tall and score at 6". I chose to trim away the banners at the top of the paper, but you do what makes your heart happy. Embellish cover with various stickers from the sticker accessory sheet.

Inside Front Cover |  Trim journaling spot and add to inside cover to form a pocket by adding adhesive to three sides, leaving the top edge free of adhesive to slip photos or ephemera inside.

Scalloped Border Page | Trim the Krafty Floral paper to 10.50" wide x 7" tall and score at 5.75". Choose your favorite border punch and fold over to form an interesting detail. Add sticker from sticker accessory sheet.

Stitched Binding Mini Album | Monika Wright

Rounded Edge Page  |  Trim Carousel paper to 8.25" wide x 6.75" tall and score in center

Happy Journaling Card Page  |  Trim the Big Top paper to 11" wide x 7" tall, scoring at 5.50". Choose your favorite journaling spots to add to the front, inside and back of page as seen in photo earlier in post.

Journaling Card Flap Page  |  Trim journaling spots from the Always paper, as seen in photo earlier in post, and score where needed. Add stickers from sticker accessory sheet.

Inside Back Cover  |  Trim journaling spots from the Always paper. Add adhesive on three sides, leaving room to slip another journaling spot inside the pocket you've created. Add stickers to form a pull tab. 

Using Journaling Card As A Pocket | Mini Album

To bind your mini album, arrange your scored sheets of paper in a pleasing, staggered arrangement. Clip the pages on one side to hold them in place while stitching and don't forget to backstitch at both ends to hold your pretty papers permanently in place.

'll be using my mini book to share my thoughts about opening my Etsy shop three years ago and my dreams for the growth and future of my company. I'll share the completed mini book on the blog next week. What will you use yours for?

I'm happy to answer any questions you leave in the comments!

This mini book was originally featured on the My Mind's Eye blog for my monthly 
Mini Albums with Monika feature, but I wanted to share the tutorial here as well.

a lesson in how to operate a track hoe

Crafty projects have been scarce in this neck of the woods lately. Sure, I've been busy keeping up with shop order, but the huge majority of the last week has been taken up with a crew of guys preparing and setting forms for concrete. So, in between making sure the girls have brushed their teeth, made their beds and gotten dressed, I've been popping in and out and checking on the progress of the concrete crew and all that goes with that.

I hope to share the madness that is our mud porch project in a future post, but in the meantime, I just had to share these photos with you.


Because, it's not every day a girl gets a lesson in operating a track hoe from their Papa. Heck, I'm 49 and haven't had a lesson. Yet.

And this is reason 15,123,522 I dearly love my life.